How To Install A VELUX Roof Window

VELUX roof windows are not only a stunning visual enhancer – bringing high levels of daylight in throughout the year – they're also a great investment; adding value, streamlined style and modern benefits to your home.

However, installing a VELUX window can be a daunting task, especially if you've never done anything like it before. So, to help you out, Roof Giant have put together a useful guide to fitting a standard Centre Pivot Roof Window onto interlocking tiles.

Although you'll find everything you need contained within the user-friendly VELUX packaging, we're here to dispel all your common concerns, helping you to visualise each step of the process. We'll cover everything, from understanding codes to adding drainage channels and flashing kits as well as finishing off your window so it's reliably sealed and fitted securely.

Please Note: This guide has been written from the perspective of installing a VELUX window with EDP flashings. While the process is similar, we recommend you follow the guide included with your window.

Windows

Pre-Installation & Preparing Your Roof Window

All VELUX window packaging comes with a useful and easy to understand label on the outside. This is your most important point of reference prior to opening the packaging as it illustrates everything you need to know about what's inside.

On the label you'll find our unique coding system that, broken down, indicates the style of window, the external frame size along with the dimensions, the frame colour and the glazing. The label also includes the total weight of the window and packaging combined, the roof pitch (15 degrees is always the minimum requirement for VELUX windows) as well as a QR code that will give you access to a special video clip animation or graphic to help with the installation process. Full physical instructions can be found inside the box.

Although the relevant handling symbols are described on the packaging, it's important to reiterate that you should store your VELUX window so the arrows are pointing upwards, as well as away from rain or moisture-prone environments. Your VELUX window also contains fragile contents, so do be careful when transporting it around.

You don't need to open the box with a box cutter either as all boxes can be easily peeled open using the handy pull tabs provided.

Step 1: Remove the cardboard, staples and anything else that surrounds your window, BUT make sure you look out for a slim rectangular box found at the top of your window, as this contains important components that will be needed during the final stage of this guide.

Step 2: The bottom of the window is lined with polystyrene and you'll also notice another labelled box containing screws and brackets. Keep these elements in place and lift your window slowly up into a horizontal position.

Step 3: Disconnect the frame from the sash. Before you open up the sash, the ventilation bar needs to be engaged by removing the corresponding polystyrene. Make sure you clear the vents of any excess packaging and re-engage the vent bar. The locking mechanisms will then easily open up.

Step 4: Remove the polystyrene blocks from the ventilation bar, rotate them and push them on to the top of the opening sash. Spin the sash around so it rests on the floor and support the frame with your body, pressing the release buttons in to release the sash.

Step 5: Once the release buttons are engaged, the frame can be lowered to rest on the floor and the sash set safely to one side.

Recessed or Standard? Work out how you want to install your roof window...

You'll notice your window has red and blue lines running around the outside of the frame. The red line indicates standard installation and the blue for recessed.

These red and blue colour codes will correspond to directions outlined in the instructions provided. Brackets included will easily fit to either recessed or standard slots on the window that run along the red or blue lines. Work out what type of installation you want and screw in the brackets accordingly.

Lining Up The Frame & Fitting The Insulation Collar

Window Insulation

Before fitting your insulation collar, make sure you refer to the easy-to-use VELUX labels on the collar packaging to make sure everything matches up to your corresponding window. As with all VELUX packaging, it can easily be peeled open with the tabs provided, removing the need for sharp box cutters. Inside you'll find a separate set of complete instructions and a QR code to make the installation process easier.

When you've opened up the packaging, you'll see two longer pieces to cover the length of your window as well as two shorter pieces for the top and bottom.

There are also variations available on the thicknesses of the foam insulation that can easily be compressed, peeled off or used at the maximum tolerance according to your specific needs. The individual pieces of the insulation collar will easily clip together in the corners to create the shape of a frame that can be fitted through your window opening easily. Simply feed it through the open space in your roof and lower it down so the bottom of the collar rests on the bottom section of the roof window opening. Carefully lower the other parts of the window so it catches on the battens, and once complete, you have an insulated framework onto which the window can be installed.

When installing your window on top of the insulation collar, always feed the window through the opening and connect it gently onto the bottom section first to avoid any accidents. As for the rest of the window, address the top and side parts of the window frame by gently pushing it onto the insulation. The insulation may prevent a secure connection at first, so carefully press in the insulation, focussing on each side independently so that the window can simply slot into place.

Next, fix the window into place from the base, using the screws provided to drill into the bottom brackets. You'll notice that there are longer and shorter screws available with the kit – the longer screws are crucial as they are designed to drill into the hole at the furthest corner of your bracket. You'll also notice that VELUX has provided two screw hole options here next to each other in case there happens to be an existing screwhead in the way on your roof structure that prevents you from drilling the screws in successfully.

Once drilled, these longer screws will firmly secure your window into the rafter and overall roof construction. The smaller screws provided will secure the insulation collar to the window itself. Always read the instructions provided to make sure both the longer and shorter screws are installed in the right location. Simply duplicate the process on the opposite bracket.

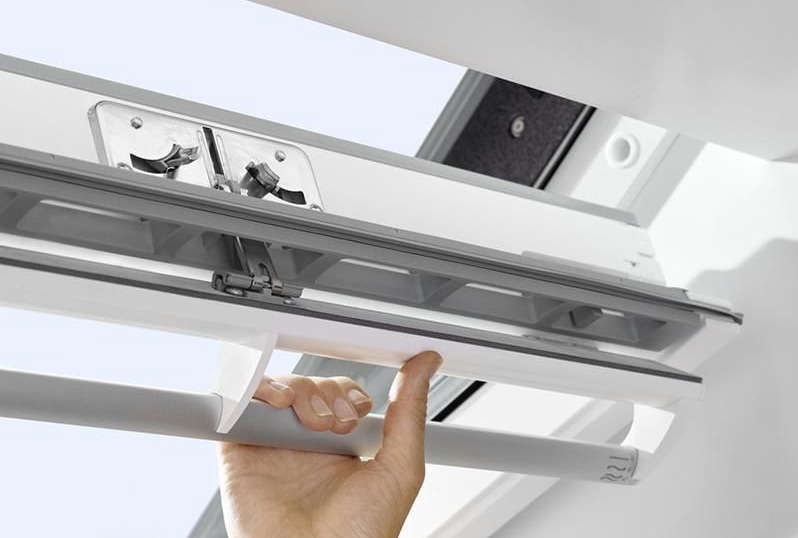
The top brackets require a slightly different process. Using the shorter screws provided, partially drill in these screws into the centre of the horizontal slot and stop when they sit about 10mm from the bracket – this allows for any levelling and adjustments later on. Do the same for the opposite side.

Use the sash to work out if everything in the frame is square and level. Simply pick up the sash by using your left hand to balance the sash and your right hand to support the weight of it. Having your right hand underneath the sash will also make it easier to pull out the barrel bolt so it can lock into the bottom of the frame.

Once your window is in the frame, the sash can easily clip into the frame hinges, securing your window into place so that you can begin to check that everything is properly squared up before moving onto the next step.

Installing The Underfelt Collar & Drainage System

The underfelt collar is a breathable membrane with a pair of ordinary flat sections and pleated side sections. The pleated parts are designed to make it easier to dress over and secure to the roof battens.

First off, open up the underfelt collar and simply arrange it over the outer roof window frame. Using the butyl strips around the edge of the underfelt collar, peel the butyl covers off gradually and stick the strips around the frame, working slowly around and keeping the underfelt smooth with your other hand to create a smart end result. You'll also see there are butyl strip tabs to fold round and secure neatly to each corner of the window. Simply repeat on all four external edges before moving onto the next section.

To keep the base section of the underfelt material secured to your roof, it needs to slip beneath the battens below the window. Simply lever up the batten slightly (using a claw hammer, or similar) and feed the membrane underneath, adjusting the material so that it's neat and flush with the bottom section of the window. Afterwards, simply fix the batten back into place.

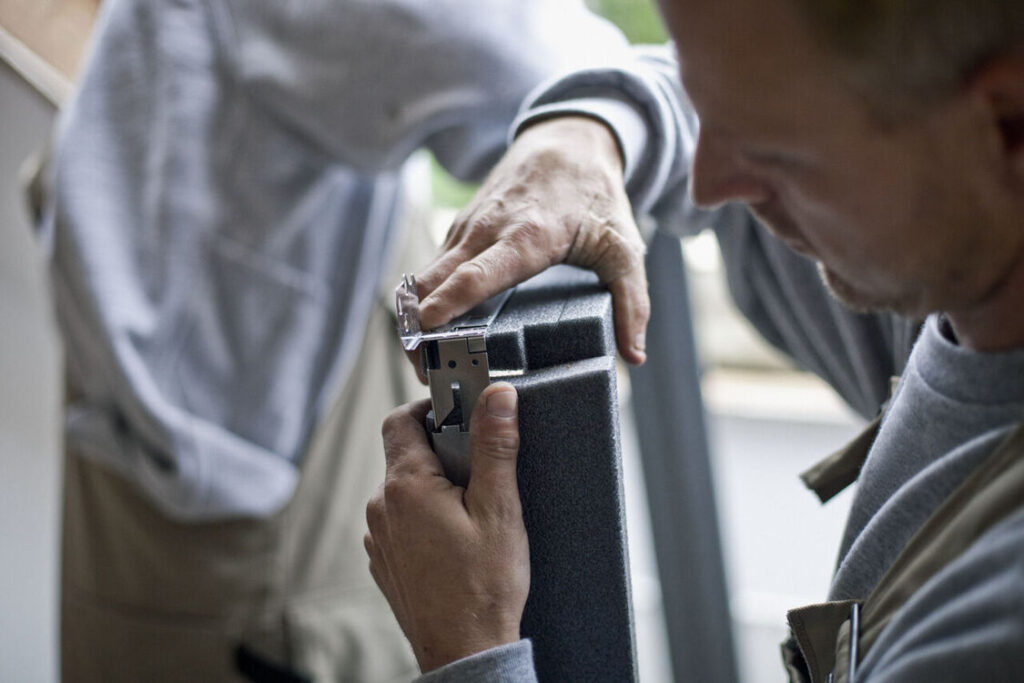
The next step is to arrange the pleats. The clever pleated design will fit around the battens on the sides and can be easily stapled into place.

Once you're happy with the pleat arrangements, staple them on top of the batten you're working on and both sides so you have 3 staples applied per batten. Repeat the process on all the other pleat covered battens.

Drainage Channel Installation

When preparing the drainage channel for installation, a letterbox style flap will need to be cut into the roof membrane. However, in making this incision it creates a flaw in your roof, through which water can enter. So, using the butyl tape provided in your VELUX kit, apply the entire length of tape along the outer edges of the newly created flap.

Once one piece of butyl is stuck down, peel off the protective plastic and repeat again on the other side. The butyl itself will seal securely to the underfelt collar. Lay the top section of the underfelt collar flat on to the roof and place the drainage channel on top. Fold the top section back over the channel, lift the flap of felt you cut earlier, and slide the gutter up until it meets the flap. Now secure the channel to the roof using the screws supplied.

The channel itself can be extended in length and comes with an array of screw fixing holes. Tuck the underfelt collar and flap into the gutter, to create a smooth channel. The drainage channel clips can then be applied to the channel to secure the gutter and material firmly in place.

Window

Flashing Kit Installation & Completing The Installation

As with the previous steps, the flashing packaging will come with all the relevant codes and instructions to make the installation process more straightforward.

Find the tabs and tacks provided and simply hammer them into the bottom sections of the window so you can fit the flashing apron firmly into place.

You'll notice that every flashing component comes labelled with a number that corresponds to information in the flashing instructions: for example, the apron might be labelled "1". Simply arrange the apron underneath so it's flush with the bottom section of the window.

Part number 2 will fix the apron securely into place, so screw it over the apron as described in the instructions via the end brackets. Screws only need to be secured firmly, not tightly into place.

Next, unpack all the left and right-handed soakers to apply to each side of the window. You will find two soakers labelled "3.1" with the remaining oaks labelled as "3.2". Begin with the 3.1 on each side when you start fixing the individual soakers to your roof, positioning them under the tiles and screwing the tiles into place.

Work upwards, lining up each soaker underneath the corresponding tile, fitting them into place as you go. If the final soaker at the top of the window juts out over the top, grab a pair of pliers to cut into the soaker and bend it round, following the shape of the window.

To fit the side covers, remove component number 5, as described in the instructions, and clip the frame covers on either of the longest sides of the window. Reapply part number 5 over the top of the newly fitted covers as before – they will snap into place now the frame covers have been applied. The instructions will help you to work out which of the covers and components belong to the left or right side of your window.

The final section to add to your window is a packaged piece that came with your VELUX window, as explained in a previous section of this guide. This component is designed to attach to the top section of your window. All you need to do is screw this piece into position with the screws included, giving your window a finished appearance before you apply the final piece of flashing to the top of the window. Just push it into place and secure the relevant tabs down. Once this is done, the sash can simply and easily be reattached to complete your window.

If you need help choosing a VELUX window but don't know where to start, use our handy VELUX Selector Tool, filtering by size, finish, glazing and more.